Affiliate marketing and Native advertising Reviews
There are so many platforms in the affiliate marketing and Native advertising is by far the most favourable traffic source to me. I have seen tons of affiliate marketers try it out recently. It became pretty much everywhere in the last few years.
It also consistently increases in traffic every year, and I can assure you it is not going anywhere soon.
In fact, according to eMarketer and looking at the video part only for native ads, it has increased over 24% last year in spent in the USA alone.

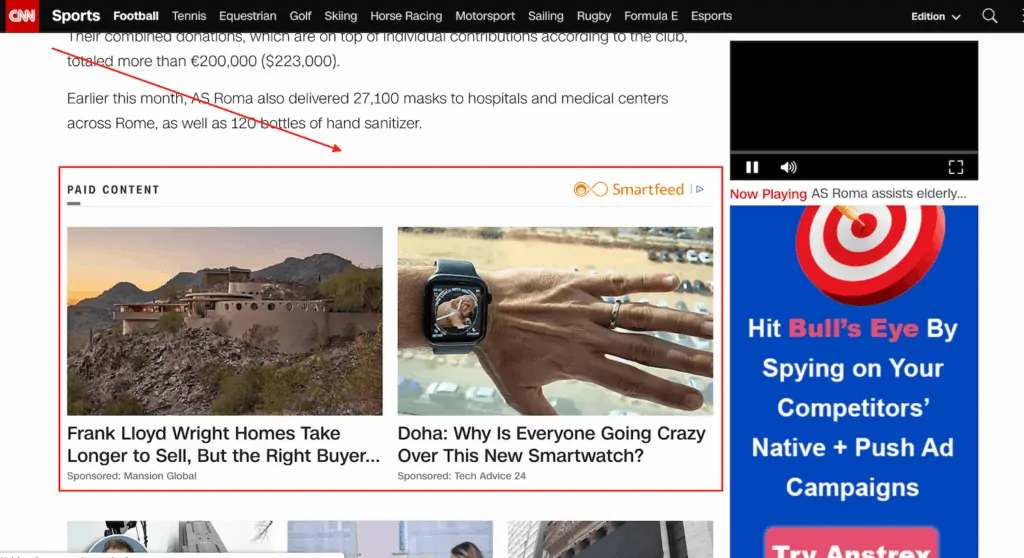
The best thing about video native ads is that people don’t usually see them as ads. They click on the creative thinking they will be taken to another article, which is something you must consider when designing your pre-lander.
Let’s see what they look like first!
Pro tip: You can see the traffic source name in the ads. This is a manual spying trick that I use quite often.
What To Run On Native?
This is a question that I hear all the time. To give you a proper answer, we should look at it from 2 aspects, like all other traffic sources.
Learn How to Run a Paid Affiliate Marketing from Start to Finish. The guides in the ebook teach you how to Spy on Other Affiliates, How to Plan, Execute, Optimize and Scale Campaigns Step by Step. It's 100% FREE, enter your email to grab your copy.
1 – What traffic sources do affiliate networks accept?
I can’t recall even one incident where my affiliate manager said “no” to native traffic. It’s pretty much accepted everywhere. It is known to be of a higher quality than other sources like push, banners and pops.
So, I would not worry so much about this.
2 – What offers do native networks accept?
This is the real question because native networks are getting stricter with time. For example, most of them now require putting the word “Advertorial” on top of the pre-lander.
However, unlike Facebook, you can get away with a lot of things, like gambling, crypto and nutra, especially when you develop a good relationship with the company.
To help you get started faster, here is a list of verticals that work very well (according to me) on native:
- Nutra
- Health & Beauty
- Crypto & Forex
- Insurance
- Solar
- Education
You can of course run many other verticals, but these have been tested by me and worked very well.
The best way to find offers, in my opinion, is to always talk to your affiliate manager.
Native Spy Tools
There are many spy tools for native in the market. I will mention my top 2, but you can feel free to google or ask for more.
1 – Adplexity Native
If you’re an affiliate marketer, you must know about this already. By far my best spy tool for all traffic sources, not just native. This one usually costs $249.
I don’t think there’s any point to write much more about Adplexity.
2 – Anstrex – Native
This is a lot cheaper than Adplexity – it’s only $59.00 per month for native only or $124.99 for native and push together.
Obviously, their inventory is not as big as Adplexity, but if you’re short on cash, this is a good option to start and get familiar with the market.
Simply search for the vertical or keywords you are after.
I will take you through how to spy on native step-by-step for this one.
Let’s say we are looking for diet landing pages in the UK.
Go to the homepage and click on the search button at the top right.

Write “diet”.
You need to be creative and find keywords that match your vertical. Using the same above example, you can also use “weight loss, fat, lose pounds, lose kg”.
Then filter by country in the top bar.

You can also use any other filters on the top to fit your criteria like language, platform (device)..etc.
Pro tip: Choose Gravity filter (1 to 2) to see what is working right now.
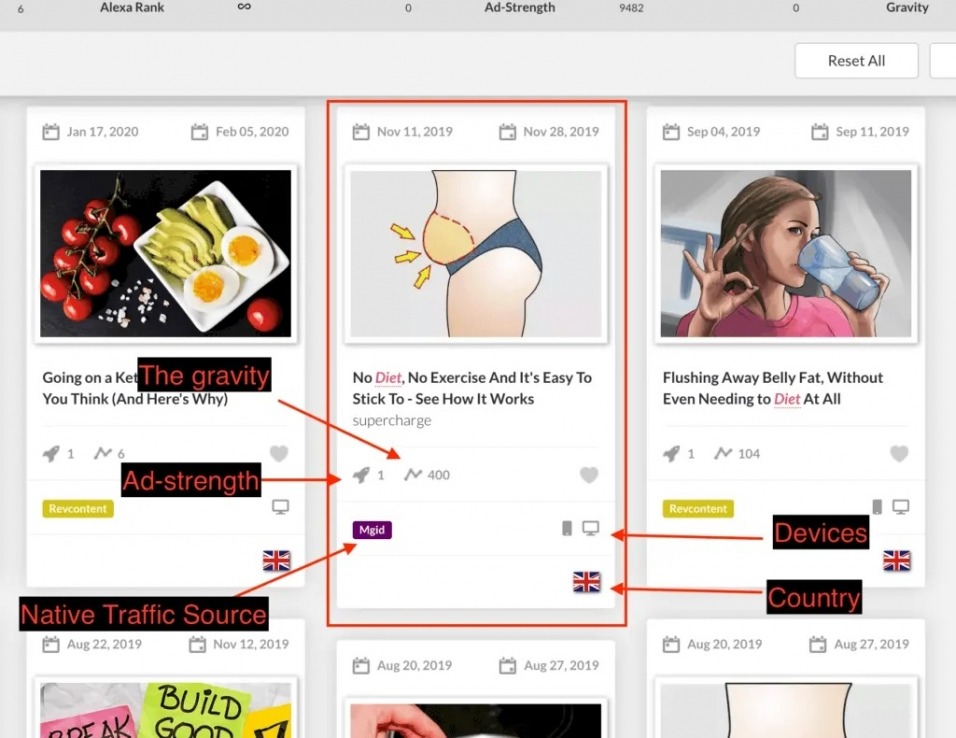
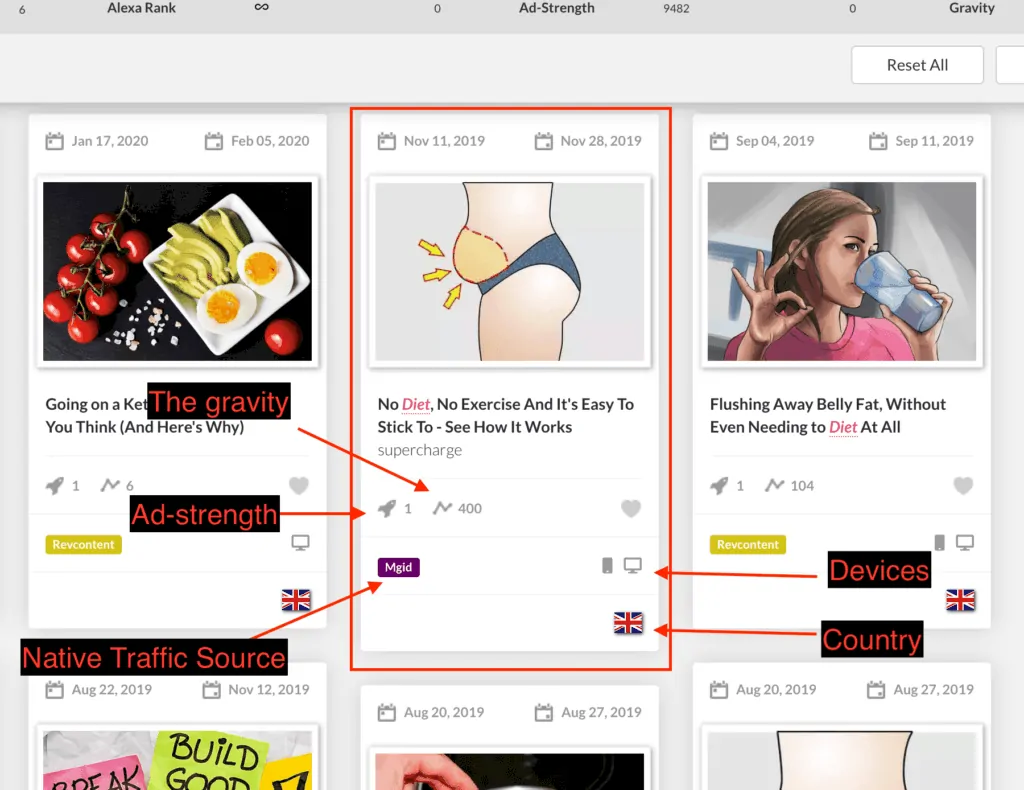
Let me illustrate the above tip! There are 2 important filters you should understand.
Ad-Strength
This criteria measures the ad performance over the entire ad’s life. A value of zero (0) means that particular ad had almost no traction, and a value less than 10 means that ad had very little traction.
This is an important measure only if you want to see the ad’s entire performance.
Gravity
This criteria measures the ad’s performance over the recent few weeks, which is probably more relevant to our work. The number is usually small here: zero (0) means no traction, one (1) means the ad got traction recently, while more than one (1) means it currently has traction.
Choose whatever ad you think is relevant to your offer.
Let’s analyze an example to make sure you’ve got the full picture.
And simply click on the ad and save it as an image. For the title, you can just copy and paste it into an excel sheet or something.
If you click on the image itself, you will get shown an option to reverse search the image in Bing, Google and TinEye.
If you click on the ad title, you will see another page where you can download a landing page in addition to other options.

If you are lazy like me ☺ just tick all the creatives you want, then click on “Zip” to download them. It will download titles and images together. However, the landing page part still has to be done one by one.
Of course, some landing pages are full of bad code you really do not want. Make sure you clean them out first or contact these guys to do it for you for a few dollars.
Here is a link for the above 4 creatives I downloaded for you to understand further.
Now you have got a few creatives proven they are working right now for you to try.
Ideally, you would need the following for a native campaign for a good start and testing:
- 3 Images from spy + 1 from you
- 3 titles from spy + 1 from you
- 3 landers from spy + 1 from you
- 2 Offers – even if it is the same offer from different networks
Now, let’s move to the next step.
I am going to assume you know how to add an affiliate network, lander and offer to your tracker. If not, please check out iAmAttila or STM Forum for beginner guides, or just google it.
Native Traffic Sources
To make it simple, there are 2 types of native traffic sources:
- Direct Traffic Source like MGID, RevContent and Taboola. This is where you create campaigns directly with these guys.
- DSP (Demand Side Platform) like VoluumDSP, Earnify and Zemanta. This is where DSP networks act as a middleman with the direct traffic sources.
If you are starting out, I would recommend you use the first option as DSP requires different techniques in terms of understanding the incoming traffic.
Here is a list of the native sources I know of:
- Outbrain
- Taboola
- Nativo
- RevContent
- MGID
- TripleLift
- NativeAds
- Sharethrough
- Media.net
Let’s dive right it in on how to set up a campaign in RevContent.
Make sure you have a campaign link from your tracker first.
If you don’t know how to do this, the below guides will take you through the whole process step-by-step.
- RedTrack
- Voluum
- FunnelFlux
Now, sign in to RevContent. If you are new and about to sign up, take note that you will not be able to add a credit card to pay unless you have at least 1 approved campaign.
Create Campaign Boost
Click on Create Campaign Boost
Choose/type your campaign information.
It’s pretty standard like most traffic sources; however, in case you’re a beginner, here’s what every field means.
Boost Name -> your campaign name
Bid Amount -> how much you want to bid per click – CPC
Budget Amount -> choose between unlimited (DO NOT DO THAT) and daily budget (DO THIS)
Optimized for -> engagement means the campaign will be optimized for people to click more; however, CPA ROI means the campaign optimization will be based on pixels on the thank you page, similar to Facebook.
Branded logo -> RevContent will detect the logo from your page, but you can also upload your own.
Scheduling -> when the campaign will start and end.
Pro tip
If you don’t know the best bid to start with, contact customer service at the bottom right of the page and just ask. They will answer you within 10-20 min.
Look, I have an example for you. Choose your target audience.

Make sure you have selected Native from the dropdown above. And then choose other targets like country, city, devices,..etc.
Finally, add UTM if you have and any view tracking code if you want. Your tracker should do this anyway.
Now your campaign is saved.
Let’s upload some creatives.
Click on Content
Add new content or choose from a previously uploaded one. Let’s assume this is your first time, so paste your URL here.

And then fill in your creative details.
When possible, I highly recommend using variables in your ads.
In the campaign URL, you can use the following variables:
- City – {city}
- State – {state}
- Country – {country}
- Boost Id – {boost_id}
- Content Id – {content_id}
- Account Id – {acc-id}
- Widget ID – {widget_id}
These should have been set up in your tracker already when you added RevContent as a traffic source.
In the headline, you can use the following only:
- City – {city}
- State – {state}
- Country – {country}
That’s it! Your campaign is pending approval now. It should take a few hours to get approved.
Congratulations!! Now you have your first native campaign!
Summary
Add an affiliate network to your tracker
Add a couple of offers to your tracker
Use spy tools to obtain at least 3 creatives and 3 landers to start with plus one of each of your own
Create a campaign in your tracker
Create a campaign in RevContent or any other native source
If you like the post and would like to see a second part of optimization and more about bidding and budget, let us know and we may do it for you.